
Have you ever pulled an engine down or even just removed some of the side covers to renew the clutch and when it comes time to put it all back together, you pay a visit to your friendly local Main Dealer only to discover the cost of the gasket set is almost as much as the cost of a replacement second hand engine?
How can simple paper gaskets cost so much? I don’t have the answer, but I know, even for the amateur, the cost of making your own gaskets isn’t expensive at all.
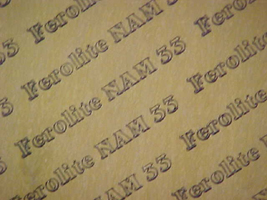
Gasket paper is usually available from bearing retailers and car parts retailers and is normally stocked in rolls or in sheets of 1.0m x 0.5m (39 ⅜” x 19 ¾”). Thicknesses vary between 0.15mm, 0.25mm, 0.40mm, 0.80mm, 1.50mm and costs between $3.00 and $15.00 per sheet. That’s a lot of gaskets for little outlay.
It is absolutely imperative to match the homemade gasket thickness to the original equipment gasket thickness. A centre case gasket that is too thick can cause the transmission shafts to float more than the factory tolerances and the crank could be pulled too far to one side, possibly resulting in side loads on the pistons or connecting rods.
If, on the other hand, the gasket is too thin, it is possible that the cases will not mate properly, and if they do, the tolerances may well be too small and the oil supply could be restricted or blocked, resulting in engine seizure.
The thickness of side cover gaskets isn’t as critical as long as no mechanical or hydraulic clutch operating mechanisms are integral with the side covers.
I have come across rebuilt engines that leaked oil even though OEM gaskets were used. The reason is often due to bad attention to the even torquing of the case screws, but is usually because of careless damage to the cases or covers.
Sometimes nicks in the soft alloy cases and covers may be caused by over enthusiastic use of a sharp steel gasket scraper. Larger dents may have been caused by the covers having been dropped.
Before any new gaskets are made and fitted, all the old gasket material must be entirely removed and the mating surfaces examined for any burrs or nicks.
What you will need.
- 600 grit wet-or-dry sanding paper.
- Fine carborundum grinding paste.
- Gasket scraper.
- Hammer.
- Old engine oil.
- Piece of plate glass.
- Plastic kitchen cutting board.
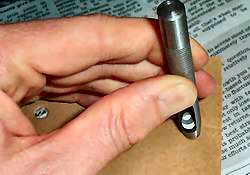
- Professional compass with cutter blades.
- Scalpel or craft knife.
- Scissors.
- Some small rubber O rings.
- Thinners or acetone.
- Wad punches to suit the diameters of the screw holes.
Getting Started
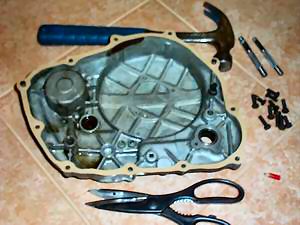
Having separated the covers from the cases, very carefully remove all traces of old gasket paper with the gasket scraper. If the covers have been replaced previously and there are traces of gasket compound, the residue can be cleaned off with some acetone or thinners.
In the good old “Kelloggs” days, I would simply wipe some dirty old engine oil over the face of the cover and carefully place it face down on the non-printed side of the cereal packet. After about ten minutes, the oil would have soaked into the grey material, leaving a perfect black outline of the cover with the hole locations clearly evident. While the packet was still of reasonable size and strength, I would commandeer my mother’s leather punch pliers that she used to add holes to my leather school belt as I grew, and nibble out the gasket holes.
Steady cutting with my mother’s best dress making scissors (which I was informed on several occasions, were not for cutting paper) and I had the new gasket cut out. Not being the best quality paper in the world, they were reasonably fragile gaskets until installed on the engine.
That was then, when British bike engine cases were quite thick walled castings, but as I outgrew them and moved on to the new era of Japanese and Continental bikes with their thinner and superior die cast cases, I quickly learned there were better materials and methods with which to make engine gaskets.
Although the dirty oil method will work perfectly well with modern casings and gasket paper, it’s not always desirable to have oil soaked gaskets, but with more pocket money and a selection of my own tools, making proper gaskets from proper gasket paper suddenly became an option for me.
The secret of making the more intricately shaped and narrower gaskets is to ensure the gasket paper doesn’t move while the engine cover’s outline and hole centres are being marked out, otherwise the gasket may end up too narrow in places resulting in it not sealing properly.
Cut a piece of gasket paper large enough to cover the face of the engine cover. Write “COVER” lightly on one side of the paper in pencil so you can repeatedly orientate the paper the correct way up until the gasket is finished. Be considerate with what will be the centre of the gasket, as the “waste” area will probably be large enough to make a gasket for something else someday.
The first thing to do is to attach the paper to the cover. Place the cover face up on a sand bag or pile of cloths and lay the piece of gasket paper, “COVER” down, over the upturned face of it.
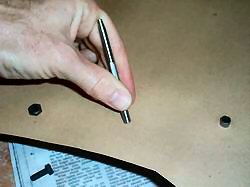
You now want to mark the location of just one of the cover’s holes. The set of wad punches I use have a nicely domed end that I use to press on the paper, directly over one of the holes, thereby creating a slight dimple in the paper. If your punches don’t have nicely formed domes, then the ball of a ballpein hammer will work admirably. Do not use the hammer to hit the paper against the cover as it will damage the soft alloy face.
Remove the paper and turn it over. You’ll see a nice sharply defined ring where the paper pressed against the edges of the hole. Pick through yourselection of wad punches until you find one the same size as (or fractionally bigger than) the ring on the paper.
Place the paper over the cutting board and centre the punch on the hole mark and then give it a sharp rap with the hammer. The result should be a perfectly clean hole.
Replace the paper on the upturned cover and drop one of the cover screws through the hole in the paper and into the hole in the cover. Replace the cutting board on top of the paper and mark another hole on the paper roughly on the opposite side of the cover to the first hole. Remove the cover screw and paper and punch the second hole out with the wad punch.
Replace the paper yet again and drop a cover screw into both holes, but this time, push an O ring onto each of the screws to retain them.
Now that the paper is secure, you can proceed to mark the remaining holes. When the holes have all been marked, you can punch them and secure the paper to the cover with all the screws and some more O rings, though two screws will normally hold the paper well enough.
To mark the inner and outer edges of the cover onto the paper, hold the hammer close to the head and slide it along the outer edge at a very slight angle. Again, the idea is not to use the edge of the cover to cut the paper, but simply to make an impression in the paper which can be clearly see for cutting with a blade or scissors. Run the hammer around the inner edge of the cover too, being careful not to stretch the centre of the gasket paper down too much.
When all’s done, remove the two screws and lay the paper upside down on the cutting board and punch out the last of the holes. Some areas of the gasket may require careful trimming with the scalpel, but most of it should be accessible with a pair of scissors. That’s it!
Fitting The New Gasket
Before the new gasket can be fitted, it’s essential to clean up the mating faces of the case and cover to ensure they have the best possible chance of sealing and preventing leaks. Even the smallest amount of old gasket could result in a high spot which would result in the cases not meeting properly and possibly causing the cover to warp under the pressure of the screws. Use an old kitchen brush or toothbrush to scrub the faces with some thinners. The thinners may dissolve the toothbrush handle, so be warned and work quickly. Finish by wiping the parts clean with some thinners applied to a cloth.
Once the covers are meticulously clean, carefully examine them for any burrs or nicks. Any damage around the edges will be easily noticed, but what may not be so apparent is a slight lip around the screw holes.
A clean steel ruler or straight edge laid along the cover and case faces may show up any such defects, but there is one sure way to highlight any faults.
In the days of wooden TV sets, they used to have a separate heavy plate glass directly in front of the tube. These glass plates were to be found at every rubbish tip and down the back of many gardens. As a boy, I must have thrown stones through countless old TV tubes, but on one occasion, I had the foresight to bring home one of the glass plates.
These plates are perfectly flat and ideal to use as a levelling plate for aluminium cylinder heads and engine covers etc.
By smearing a little fine grinding paste onto the glass and rubbing the mating face of the aluminium alloy cover in a figure of eight pattern with gentle even pressure a couple of times, any high spots where damage occurred will be instantly evident as freshly ground grey areas. Rotate the cover several times to avoid removing too much material from one side. The idea is to only remove any high spots and to this degree, as soon as the face becomes uniformly grey, you have succeeded in flattening it.
A reasonable alternative to the TV screen and grinding past would be an off-cut of plate glass and a sheet of 600 grit wet-or-dry sanding paper. Thoroughly soaking the paper will help “vacuum” it onto the glass.
If the engine hasn’t been fully dismantled and the main cases are still part of the assembly, then rubbing their faces on the glass plate is out of the question. In such an event, a clean, new sharp file lightly drawn across any identified damage will at least remove the high spots. Don’t over do the filing, though there’s less chance of the cases being warped than the outer covers anyway.
Brush away any filings and give the mating faces a last wipe with the cloth.
Lay the gasket onto the cover and insert a couple of the case screws to locate it. Offer the cover up to its corresponding case and apply light pressure to hold it in place. Start the screws to retain the cover and gasket.
Check the gasket is positioned correctly and not caught or nippedanywhere, and then insert the remaining screws and do them up loosely.
Start tightening the screws in a criss-cross fashion to avoid straining the cover unduly. Refer to the relevant workshop manual for the tightening torque figures for the screws. As a guide, M6 screws should be tightened to 0.8 – 1.2 kgf/m (6 – 9 lbf/ft) and for M8 screws; 1.8 – 2.5 kgf/m (13 – 18 lbf/ft).
